Golden Tiger EA v12
User Guide
This program trades gold only — it reads its own signals, places its own orders, adds to them, and exits on its own. This guide lays out plainly what it does, what the risk looks like, and which setting is actually worth your attention. Read it through, then decide whether to start — it’s fine if you decide not to.
1. What This Is
GoldenTiger EA v12 is an automated trading program that trades gold (XAUUSD) exclusively, running on MT5. Its method is called a laddered dynamic grid: when an entry signal appears, it places a first order; if price moves against it, the EA adds another order at a better price under its rules, recalculating the whole round’s target price as it goes; the whole round then exits together for a profit, and the EA waits for the next signal.
Four independent strategies watch the market at the same time inside it, each with its own entry conditions, its own rounds, and its own lot ladder. They share the same account and the same settings — you don’t need to configure them separately.
2. Three Things to Understand Before You Start
This is a tool with a clearly defined risk structure. A grid strategy trades unrealized floating loss for a chance to exit profitably: most rounds are shallow and close within hours, but in a strong one-directional move, a single round can add a dozen or more orders, with floating loss reaching 30–40% of your funds and lasting several days. This guide lays that out plainly, including what the worst days in the backtest actually looked like. No automated trading program (EA) can guarantee profit.
1. Floating Loss Is Normal
As the grid adds orders, unrealized loss widens first and is recovered all at once when the round exits. Across the 51-month backtest, the single worst day was November 25, 2024, when floating loss reached 33.3% of funds under factory settings. That round eventually closed for a profit, but in the moment, it looked like the account had lost a third of its value.
2. Your Biggest Enemy Is Closing Positions by Hand
The moment floating loss is deepest is exactly when you’ll be most tempted to close everything by hand. Doing that turns an unrealized loss into a real one — and that round might otherwise have recovered. So Section 8’s rule for choosing a risk level comes down to one thing: pick the level whose number you can actually live with seeing.
3. The Risk Control Line Is the Last Safeguard
The factory setting is 95% of funds: once floating loss reaches that level, the EA closes every open order immediately. All 25 backtested combinations stayed within this line the entire time — it exists purely for the “just in case” scenario. You can set it lower, but that means accepting a loss sooner.
With the factory setting (R=27%, auto-skipping the 4 most volatile hours), the deepest floating loss over the 4-year-3-month backtest was 33.3%. You might consider setting the risk control line around 50% — if the market ever moves even more extreme than in the backtest, you’d still have at least half your principal left. See Section 9 for detailed floating-loss data.
3. Account Requirements
| Requirement | Details |
|---|---|
| Currency | Must be USC (cents). Accounts in any other currency will show “Not Running” on the panel and stop trading |
| Symbol | Gold XAUUSD, with a 1 oz/lot contract and a 0.01 minimum lot size. Your broker can prefix or suffix the symbol name however it likes; the contract spec itself must match exactly — e.g. an account using 100 oz/lot will be blocked |
| Authorization | Both the account and its server must be on the authorized list — contact customer support first to get it activated |
| Clean account | The account may only hold this EA’s own orders. Close out any orders from other EAs, or left over from an older version of this EA, first — or use a separate account |
For EAs issued in 2026, authorization runs through December 31, 2027. After that, the panel turns red with “Not Running” and lists “Account not authorized” — the EA stops entirely, and any open orders become yours to manage from that point on (same consequences as the first red-light case in Section 10).
In 2027, be sure to contact customer support for a new EA file valid through December 31, 2028. The EA itself has no expiry reminder, so mark the date yourself and switch files ahead of time; support can extend your license the same way each year after that. See Section 11, “Switching Versions or Files,” for the steps.
4. Installation and Setup
- Place GoldenTigerEA v12 Client.ex5 into MT5’s Experts folder. In MT5, go to File → Open Data Folder → MQL5 → Experts.
- Restart MT5, or right-click “Expert Advisors” in the Navigator panel and choose “Refresh”.
- Open an XAUUSD chart. Any timeframe works — the EA reads its own data independently of the chart’s timeframe.
- Drag the EA onto the chart. In the settings window, check “Allow Algo Trading” under the “Common” tab; see Section 6 for the “Inputs” tab.

- A panel appears in the chart’s top-left corner. If the status light is red with “Algo Trading OFF (toolbar button)” as the reason, just complete the next step.

- Enable the “Algo Trading” button on MT5’s toolbar (it turns green when on). Once the panel’s light turns green or orange, it’s running — both mean the EA is active, and the only difference is the status text (see Section 5).

Toolbar “Algo Trading” button ON (green) 
Toolbar “Algo Trading” button OFF (red) — the panel light turns red
Attach only one instance of GoldenTigerEA per account.
5. Reading the Panel
Status Light
Green or orange both mean the EA is running — only the status text differs; red is the only color that means it has stopped. All three orange states simply mean “no new rounds for now” — open orders keep adding on, keep exiting normally, and the risk control line keeps working as usual.


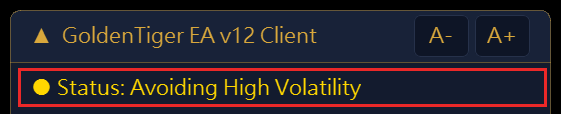


Information on the Panel
Risk preference (R), total auto-skip hours, trading hours (shown in server time), the risk control line and the percentage currently used, and open order count with P&L.


Expandable Items
- User Risk Preference: expand it to open the “Lot Ladder”, showing how many lots each order will be at your current funds, listed per strategy. If funds are too small and the result rounds to 0 lots, it shows “Insufficient funds, no trading” directly.

Lot Ladder: lot sizes are calculated from your account funds and the R you chose, then scale up along the ladder. The figures shown are for illustration only. - EA Positions PnL: expand it to see each strategy’s open positions — each round’s direction, order count, lot sizes, average price, and current P&L.

With positions open, the bottom row of the panel shows the EA orders’ current P&L and its share of funds (illustrative screen) 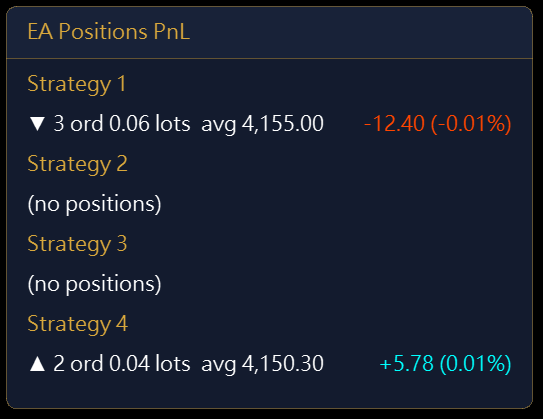
With positions open: each round shows direction, order count, lots, average price and current P&L (illustrative screen, not any real account’s positions) 
EA Positions PnL: the four strategies listed separately, no positions open here - Auto-Skip High-Volatility Slots: expand it to open “Time slots to be skipped”, listing today’s actual auto-skip windows; the first line reads “Strategy 1-3: no new rounds; Strategy 4 as usual”.

6. Settings: Seven Parameters
| Parameter | Description |
|---|---|
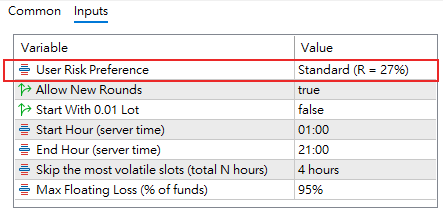
| User Risk Preference | Factory default: 27%. The risk level, five tiers: 21/24 conservative, 27 standard, 30/33 aggressive. This is the only setting worth spending real time on — Sections 8 and 9 are both about it. |
| Allow New Rounds | Factory default: true. Off = no new rounds; open orders keep adding on and exiting normally. Use this when switching versions or winding down — safer than removing the EA outright. |
| Start With 0.01 Lot | Factory default: false. On = every round’s first order is always 0.01 lots, ignoring both funds and R. Intended as a trial run for accounts too small to trade normally (where the calculated first order rounds to 0 lots). It comes at three costs: lots can only move in 0.01 steps, so the ladder’s multipliers get rounded and lose their designed proportions; lot size no longer grows with your funds; and the smaller the account, the heavier a 0.01-lot order weighs relative to it — potentially far above what R is designed for. The backtest numbers on this page assume this is off and do not apply when it is on. |
| Start Hour (server time) | Factory default: 1. The start of trading hours, in server time. |
| End Hour (server time) | Factory default: 21. The end of trading hours, in server time. New rounds only open within this window; open orders are handled normally around the clock. |
| Skip the most volatile slots (total N hours) | Factory default: 4 hours. Total daily hours auto-skipped during the times most prone to violent moves; choose 2/3/4/5/6 hours. Recommended to keep at 4 or more — see Section 9 for why. |
| Max Floating Loss (% of funds) | Factory default: 95%. The risk control line, set as a percentage of funds; once reached, every open order is closed immediately (the panel row is labeled “Risk Control” and shows the exact trigger amount). Example: with 100,000 USC and 95% set, once combined unrealized loss across all open orders reaches 95,000 USC, the EA closes everything, leaving roughly 5,000 USC. The percentage is calculated against your balance at the time, so the threshold moves as your balance does. |
7. How It Trades
Rounds
Each of the four strategies waits for its own signal. When a signal appears — and it’s within trading hours, and that strategy currently has no open position in that direction — it opens a first order; Strategies 1, 2 and 3 additionally require being outside the auto-skip windows, while Strategy 4 is not subject to them.
Strategies 1, 2 and 3 look for entries at range edges or on pullbacks; Strategy 4 waits for price to reclaim the longer-term trend line and for the direction to be confirmed before entering with the trend. Its add-on and profit-taking rules are the same as Strategy 3’s.
Adding On
When price moves a set distance against the position and the add-on conditions are met, the EA adds another order. That distance is calculated from recent volatility — the grid spacing widens when volatility is high and tightens when it’s low.
Lot Ladder
Strategy 1: the first 10 orders are all the same size as the first order; from order 11 onward, the lot multiplies by 1.2 every 2 orders (orders 11–12 are 1.2× the first order, 13–14 are 1.44×, and so on).
Strategies 2–4: orders 1 and 2 are the same size as the first order; from order 3 onward, the lot multiplies by 1.5 every 2 orders (orders 3–4 are 1.5× the first order, 5–6 are 2.25×, and so on), scaling up the whole way.
Strategy 1 deliberately holds its first ten orders at the base size to keep exposure growth low during shallow rounds. Strategies 2–4 scale up faster, but their rounds tend to run shorter.
Round-Level Profit Target
The target price is recalculated with every add-on and adjusts automatically as the order count grows. The whole round exits together.
How the Four Strategies Relate
Strategy 1 runs independently. Strategies 2, 3 and 4 are mutually exclusive in the same direction: at any given time, in any given direction, only one of the three will be opening a new round. So at most two rounds can be open in the same direction at once, and at most four rounds total across all strategies.
Two More Things Worth Knowing
- The four strategies are fully independent, so the account can have a buy round and a sell round open at the same time. This is normal: each side runs its own round with its own target, entirely on its own track.
- Auto-skip windows only stop Strategies 1, 2 and 3 from opening new rounds — Strategy 4 is exempt; hours outside the trading session block new rounds for every strategy. Whichever strategy it is, open orders keep adding on and exiting normally.
What It Looks Like in Practice: First Orders and Add-Ons
These are backtest figures, not live results. Factory settings (R 27%, 4-hour auto-skip), 100,000 USC starting capital, July 1, 2022 to September 30, 2026 (4 years 3 months), every-tick simulation including swap; holding times count market hours only, excluding weekends.
Three terms first: a round is one strategy in one direction, from its first order until the whole round is closed; the first order opens a new round; add-on orders are added under the laddered dynamic grid when price moves against the round.
Most of the time it is quiet. Over the backtest the EA opened 4,102 rounds and 3,522 add-on orders, 7,624 orders in total — 1.86 orders per round on average. Two thirds of rounds (67.7%) closed on the first order alone; the median round lasted about 1.1 hours, and 90% of rounds finished within 10.7 hours.
| Orders per round | Share of all rounds |
|---|---|
| First order only | 67.7% |
| 2 orders | 15.9% |
| 3–5 orders | 12.0% |
| 6–10 orders | 3.0% |
| 11–20 orders | 1.2% |
| 21 or more | 0.2% |
The risk sits in a small number of rounds. Only about 4% of rounds reached 6 or more orders, and the largest reached 27 — but most of the floating loss comes from that small group. The deepest floating loss of any single round was 23.7% of funds at the time it opened; with several strategies open at once, the deepest floating loss for the whole account was 33.3% (November 25, 2024). These measure different things: the first is one round, the second is the whole account, which is what Sections 2 and 9 refer to.
How often first orders appear. On average about 3.7 first orders per trading day — but there were also stretches of 3 straight days with no first order at all (the longest in the backtest was March 8–10, 2023). That means the entry conditions did not appear, not that the EA is broken.
What Time of Day Orders Open
The chart below shows which hour of the day first orders and add-on orders fell in over the same backtest. All times are server time, as shown on the panel. Each bar is that hour’s share of all first orders (or of all add-on orders).
Show hourly percentages
| Server time | First orders | Add-on orders |
|---|---|---|
| 00:00–01:00 | 0.0% | 0.0% |
| 01:00–02:00 | 6.5% | 2.3% |
| 02:00–03:00 | 5.3% | 3.4% |
| 03:00–04:00 | 5.2% | 4.1% |
| 04:00–05:00 | 4.2% | 4.3% |
| 05:00–06:00 | 5.5% | 4.0% |
| 06:00–07:00 | 6.0% | 4.5% |
| 07:00–08:00 | 5.2% | 4.3% |
| 08:00–09:00 | 5.2% | 5.6% |
| 09:00–10:00 | 6.3% | 5.6% |
| 10:00–11:00 | 5.5% | 5.7% |
| 11:00–12:00 | 6.4% | 4.9% |
| 12:00–13:00 | 6.0% | 6.2% |
| 13:00–14:00 | 7.3% | 5.8% |
| 14:00–15:00 | 7.3% | 5.5% |
| 15:00–16:00 | 2.5% | 6.8% |
| 16:00–17:00 | 0.7% | 5.6% |
| 17:00–18:00 | 0.7% | 3.9% |
| 18:00–19:00 | 2.8% | 3.0% |
| 19:00–20:00 | 5.6% | 3.0% |
| 20:00–21:00 | 5.9% | 3.9% |
| 21:00–22:00 | 0.0% | 3.0% |
| 22:00–23:00 | 0.0% | 2.9% |
| 23:00–00:00 | 0.0% | 1.8% |
- New rounds only open within trading hours. First orders are concentrated between 01:00 and 21:00 server time, when the panel usually reads “ACTIVE”; from 21:00 to 01:00 the next day no new rounds open, and the panel reads “Out of Session”.
- Almost no new rounds during high-volatility hours. First orders drop sharply from 15:00 to 18:00, which falls within the auto-skip windows, and the panel reads “Avoiding High Volatility”; the few that remain come from Strategy 4, which is not subject to the skip windows.
- Add-on orders carry on all day. When no new rounds are opening (outside trading hours or inside a skip window), open orders still add on and close as usual — which is why the add-on bars appear around the clock.
8. Choosing Your R Level
What R Means
R is the exposure ratio for each round’s first order: R% of your funds, converted into gold, gives you the first order’s lot size.
Example: with 100,000 USC and R = 27%, the first order’s notional value is 27,000 USC; at a gold price of 4,000 USD/oz, one lot (1 oz) is worth 400,000 USC, so the first order = 27,000 ÷ 400,000 = 0.0675, rounded to 0.07 lots.
That lot size is fixed the moment the first order fills and stays constant for the whole round — every later order in that round scales up from it; only the next round recalculates from your funds at that time. So as your funds grow, lot sizes grow with them (this is what compounding looks like here), and every order within one round shares the same base.
You can change R at any time — any round already in progress finishes at its original lot sizes, and the change takes effect starting the next round.
| Tier | Description |
|---|---|
| Conservative | R 21% / 24%. Backtested net profit 614,000 / 844,000 USC, maximum floating loss 26.3% / 30.1%. Good for a first run, to see how it behaves before committing further. |
| Standard | R 27%, factory default. Backtested net profit 1,143,000 USC, maximum floating loss 33.3%. Runs the design as intended. |
| Aggressive | R 30% / 33%. Backtested net profit 1,554,000 / 2,078,000 USC, maximum floating loss 37.3% / 40.8%. Best suited to someone who has already watched a deep round’s floating loss firsthand — and held through it. |
Before turning it up, ask yourself one question: if your equity dropped 40% in a single day, would you close it by hand? If yes, pick a lower tier. Closing by hand turns an unrealized floating loss into a real one — and that round might otherwise have recovered.
Funding Guidance
- Recommended minimum: USD 1,000 (100,000 USC). Below this level, the first order is too small for your funds’ growth to show up meaningfully in lot size, limiting the effect of compounding.
- Below 10,000 USC (USD 100), the first order may round down to 0 lots and not trade at all (depending on the gold price) — enable “Start With 0.01 Lot” so the EA can start with a fixed 0.01-lot first order (see Section 6 for what that mode costs). Between 10,000 and 50,000 USC the EA can run, but the first order can only come out as 0.01, 0.02 or 0.03 lots, so rounding error is large: the risk you actually carry can be several tens of percent higher or lower than the R you chose, the ladder’s multipliers get distorted too, and the backtest numbers are only a rough reference. 100,000 USC or more is still the recommendation.


With Start With 0.01 Lot enabled, the Lot Ladder starts every round at 0.01 lots and scales up the ladder from there - Recommended maximum per account: USD 100,000 (10,000,000 USC). With too much funding, later orders in a round can exceed your broker’s maximum lot per order and get capped, causing behavior to diverge from the backtest. Split larger amounts across multiple accounts.
- The thresholds above move with the gold price (as gold rises, the same funding produces smaller lot sizes), so treat them as guidance rather than a hard line.
Once you’ve picked R, the next step is choosing how many hours to auto-skip — see Section 9.
9. Choosing the Auto-Skip Hours: Backtest of 25 Combinations
Period: July 1, 2022 to September 30, 2026 (51 months). Starting capital: 100,000 USC (= USD 1,000), simulated tick by tick on “Every tick” mode, including swap. In each cell, the top row is net profit and its multiple of the starting capital; the bottom row is the maximum floating loss — the deepest unrealized loss as a percentage of funds at the time.
Why USC: live accounts are USC-denominated, so the figures you see in MT5 are already in cents — this table uses USC throughout so you don’t have to convert. 100,000 USC also happens to be the minimum funding recommended in Section 8.
| Auto-Skip | R 21% | R 24% | R 27% | R 30% | R 33% | Worst floating-loss day |
|---|---|---|---|---|---|---|
| 2 hours ⚠ | Profit 772,000 (7.7×) Floating loss 43.1% | Profit 1,091,000 (10.9×) Floating loss 49.7% | Profit 1,525,000 (15.2×) Floating loss 55.5% | Profit 2,120,000 (21.2×) Floating loss 62.2% | Profit 2,913,000 (29.1×) Floating loss 67.7% | 2023-12-04 |
| 3 hours ⚠ | Profit 701,000 (7.0×) Floating loss 43.3% | Profit 979,000 (9.8×) Floating loss 50.1% | Profit 1,356,000 (13.6×) Floating loss 56.1% | Profit 1,863,000 (18.6×) Floating loss 60.7% | Profit 2,575,000 (25.7×) Floating loss 68.4% | 2023-12-04 |
| 4 hours (factory) | Profit 614,000 (6.1×) Floating loss 26.3% | Profit 844,000 (8.4×) Floating loss 30.1% | Profit 1,143,000 (11.4×) Floating loss 33.3% | Profit 1,554,000 (15.5×) Floating loss 37.3% | Profit 2,078,000 (20.8×) Floating loss 40.8% | 2024-11-25 |
| 5 hours | Profit 542,000 (5.4×) Floating loss 26.5% | Profit 729,000 (7.3×) Floating loss 29.7% | Profit 992,000 (9.9×) Floating loss 33.4% | Profit 1,320,000 (13.2×) Floating loss 36.9% | Profit 1,711,000 (17.1×) Floating loss 40.7% | 2024-11-25 |
| 6 hours | Profit 488,000 (4.9×) Floating loss 25.9% | Profit 649,000 (6.5×) Floating loss 29.7% | Profit 875,000 (8.8×) Floating loss 33.2% | Profit 1,135,000 (11.4×) Floating loss 36.6% | Profit 1,487,000 (14.9×) Floating loss 40.8% | 2024-11-25 |
All 25 combinations stayed within the risk control line (95%) throughout.
“×” = net profit as a multiple of the starting capital. This table was backtested with 100,000 USC of starting capital.
How to Read This Table
Reading across (changing R): lot sizes scale proportionally, the entry/exit logic is identical, and the trade counts across the five tiers are nearly the same (7,624–7,634 trades). But note: floating loss grows almost proportionally with R, while net profit grows faster because of compounding. Going from R 21 to R 33, floating loss becomes 1.55× while net profit becomes 3.38×. The higher tiers look especially attractive — which is exactly where people most easily underestimate the risk.
Reading down (changing the auto-skip window): this changes entry/exit timing, which is a different mechanism from R’s proportional scaling.
Dropping below 4 hours puts you in a different risk tier entirely.
The 2-hour and 3-hour settings were fully backtested too. The result: floating loss jumps from 25.9–40.8% to 43.1–68.4%, and the worst floating-loss day shifts to an entirely different, more extreme stretch of price action. The reason is that those particular skipped windows are exactly where the deepest rounds tend to start.
Going above 4 hours leaves floating loss roughly unchanged while net profit falls. The 4-, 5-, and 6-hour rows show nearly identical floating loss; each extra hour skipped costs 10–18% of net profit.
So 4 hours is the turning point: going lower buys extra profit at a disproportionate cost in floating loss; going higher only costs you profit. It is also the factory default. If you want more profit, adjust R — leave the auto-skip window at 4 hours.
Comparing at matched net profit makes this clear:
| Setting | Backtest result (USC) |
|---|---|
| 4 hours + R 27% | Net profit 1,143,000 (11.4×), max floating loss 33.3%, worst day 2024-11-25 |
| 2 hours + R 24% | Net profit 1,091,000 (10.9×), max floating loss 49.7%, worst day 2023-12-04 |
Net profit is close, but the 2-hour setting costs about 16 extra percentage points of maximum floating loss, and shifts the worst day to an even more extreme stretch. Earning the same amount by adjusting R instead costs you far less risk.
A backtest simulates historical data; live trading involves spread, slippage, server latency, and disconnections, so results will differ from the backtest. These backtest numbers are meant to help you understand the risk structure.
10. Red Light on the Panel: Two Kinds, Different Consequences
This section is about the light in the EA panel’s status row, in the chart’s top-left corner — see Section 5. When it turns red, the status reads “Not Running” and the reasons are listed below it; just work through them one by one. MT5’s own EA icon in the chart’s top-right corner and its toolbar button colors are a separate matter — everything in this section is about the panel’s own light.
Kind one: the EA stops entirely, and the risk control line stops with it.
There are two groups of reasons; the text below the light shows which one applies:
- “Account not authorized” (including an expired license), “Symbol is not XAUUSD”, “Account currency must be USC (cents)”, or “Symbol spec mismatch: needs 1 oz/lot, 0.01 min lot”. For this group, contact customer support or switch accounts.

- MT5 itself is blocking trading: “Algo Trading OFF (toolbar button)”, “EA Trading Not Allowed (EA settings)”, or “Investor login – cannot trade (use trading password)”. You can fix this group yourself: enable the toolbar’s Algo Trading button, check “Allow Algo Trading” in the EA’s settings, or log back in with your trading password.
The consequences are the same for both groups: new rounds, adding on, target-price updates, and the risk control line all stop completely — only the take-profit level already set on each open order remains in effect.
One thing worth knowing about the second group: the EA is actually still calculating the whole time, it’s just that every action gets rejected. So the moment you fix it, everything that had queued up fires at once — any pending add-ons go through immediately, and if floating loss had already crossed the risk control line, every order closes right away.
Kind two: only new rounds are blocked.
Reason: an invalid session setting (start time at or after end time).

Consequence: only new rounds are blocked — existing orders keep adding on and exiting normally, and the risk control line keeps working as usual.
Address either kind of red light as soon as you can. For the first kind, the risk control line stays offline until it’s resolved. Everything resumes automatically once it is.
11. Disconnections, Restarts, and Switching Versions or Files
While Disconnected
Every open round has a take-profit level already placed on the broker’s server, so a round still closes normally at its target even while the EA is offline. However, adding on, updating the target price, and the risk control line all require the EA to be connected — all three pause completely during a disconnection; during that window, the only protection left is that one take-profit level on the broker’s side, and if price keeps moving against you, no one is watching the account.
After Reconnecting
The EA checks back for any add-on it should have placed while disconnected: if the current price is better than where that order should have gone, the EA places it immediately; if it’s worse, the EA places a limit order at the original price and waits. If price had already crossed the round’s target while disconnected, the EA waits until the round returns to a break-even point before exiting.
Restarting MT5 or Reattaching the EA
Open orders are picked back up automatically, and trading continues. The whole process is automatic.
Switching Versions or Files
- Turn off Allow New Rounds first.
- Wait for every open round to close out (positions on the panel reach zero).
- Then attach the new .ex5 file.
Order tagging can differ between versions — orders left by an older version may not be recognized by a newer one. Skipping steps 1–2 and switching directly can leave those orders as unmanaged orphans. Waiting for everything to close first is always the safe path.
12. Frequently Asked Questions
It’s been attached for a while with no trades — is that normal?
Yes. It only trades when its conditions are met, and sometimes those conditions don’t show up for a whole day. Across the 51-month backtest (1,097 trading days), all four strategies together opened no new positions at all on 41 of those days (at most 3 days in a row), and on 32 days there were no open positions at all for the whole day. Confirm the light is green or orange, then give it time.
Isn’t it supposed to avoid high volatility? Why is it still opening orders?
What it avoids are “the few fixed time slots that, by recent statistics, are most prone to sharp spikes and drops”, and that protection is for Strategies 1, 2 and 3: those three look for entries at range edges or on pullbacks, and the worst thing for them is to be hit by a spike right after entering — so they open no new rounds during those slots. Strategy 4 enters differently: it waits for price to reclaim the longer-term trend line and for the direction to be confirmed before going with the trend. In backtests, applying the same time restriction to Strategy 4 did not reduce risk but cut its entry opportunities by nearly 40% — so Strategy 4 is not subject to it. Also, the skip windows only affect “opening a new round”: orders already open, whichever strategy they belong to, keep adding on and taking profit as usual.
Can I add to a position or manually close a single order myself?
Leave it to the EA. It ignores any order you add by hand; if you manually close one of its own orders, it treats that order as if it never existed, recalculates the average price and target from the remaining orders, and keeps running normally — the catch-up mechanism only handles orders that were “supposed to have been added but were missed,” and always skips the one you closed by hand. The only difference is that round’s path from then on will no longer match the backtest. To stop entirely, turn off Allow New Rounds and let it close out on its own.
Can I run another EA on the same account?
We recommend a separate account. It only recognizes its own four strategies’ orders (magic numbers 11001, 22001, 33001, 44001) and ignores everything else. The real risk is sharing the same funds: floating loss carried by another EA eats into the account’s capacity to absorb loss, so during a deep round, GoldenTigerEA might not have reached its own risk control line yet when the broker force-liquidates the account. If you must use the same account, make sure the other EA’s magic numbers are different from these four.
Which chart timeframe should I use?
Doesn’t matter — it’s unrelated to how the EA works.
Do I need a VPS?
Recommended. The EA needs to stay online 24 hours a day, and both adding on and the risk control line pause during any disconnection (see Section 11). A home computer going to sleep, updating, or losing its network connection will all take it offline.
The panel shows “Insufficient funds, no trading” — what now?
At your current funds and chosen R, the first order works out to less than 0.01 lots, so it won’t place a trade. Add funds, or enable Start With 0.01 Lot (see Section 6 for the trade-offs of that mode).

Can I backtest it myself?
This version doesn’t support backtesting. The backtest numbers on this page were run by our team using the same logic; if you need other combinations or periods, contact customer support.
13. Risk Disclosure
- No automated trading program (EA) can guarantee profit. This program uses a laddered dynamic grid, which keeps adding orders in a strong one-directional move — unrealized loss can widen sharply in a short time, and in extreme cases you could lose your entire invested principal. Our current partner brokers all provide forced liquidation and negative-balance protection, so any loss is capped at the funds in your account — you are not required to cover anything beyond your principal.
- All backtest figures on this page are historical simulations, clearly distinguished from live trading; past performance does not predict future results, and live trading is subject to spread, slippage, latency, and disconnections.
- Only trade with funds you can afford to lose completely. Before using this EA, make sure you understand the risk structure described in Sections 2, 9, and 10.
- This website’s content is for informational reference only and does not constitute investment advice or solicitation. If you have any questions, please contact customer support — listen to what they say, then decide whether to start; it’s fine if you decide not to.